



Your copy-paste setup for every challenge
8 steps. Ready to use.
This guide shows you step by step how to set up a challenge with Natty Gains.
It is structured so you can copy it directly and pass it on to your team.
It is based on the platform's most important features: client segments, documents, automations, meal plans and group chats.
Table of contents
- Step 1: Create the "Challenge" segment
- Step 2:Upload documents as supporting material
- Step 3:Set up push automations
- Step 4: Client permissions
- Step 5:Create and assign a weekly plan template
- Step 6:Create client accounts with the "Challenge" segment
- Step 7:Create a group chat for the challenge
- Step 8:The challenge begins!
- More posts
Step 1:
Create the "Challenge" segment
1. In the dashboard, go to Clients.
2. Create a new segment "Challenge".
This segment is the foundation of your entire challenge, because it lets you bring all participants together in one place and work with them in a targeted way later on. Instead of managing each person individually, you create a clear structure that saves you time day to day and looks more professional to your participants.
The big advantage is not just the organization, but also better control over your challenge: content, documents, automations, chats and permissions can all be aligned with this segment. This ensures that all participants get the same framework and experience the challenge as something they do together.

Step 2:
Upload documents as supporting material
1. In the dashboard, go to Documents > Upload file.
2. Upload PDFs or images (e.g. challenge rules, checklists, motivational material).
3. Select the "Challenge" segment as the target group.
This way, only your challenge participants receive the documents directly in their app. It keeps things organized, saves you sending files one by one and gives your challenge a professional framework from the start.

Step 3:
Set up push automations
1. In the dashboard, go to Communication > Automated communication workflows.
2. Use "Add workflow" to create automated push notifications.
3. Under "Browse templates" you will find suitable triggers you can use right away. Select the "Challenge" segment as recipients.
4. Then activate the automations so they run automatically.
This keeps participants in the loop throughout the challenge without you having to send every message manually. Daily reminders for meals, weight or exercise in particular create more commitment and significantly more engagement.

Step 4: Client permissions
1. In the dashboard, go to Account > Client permissions.
2. Scroll down to Segment settings for clients.
3. Activate only the features that are relevant to the challenge.
This ensures that all participants only see the content and tools they really need. It keeps the app clear, reduces distractions and makes for a clearer, more professional challenge experience.

Step 5:
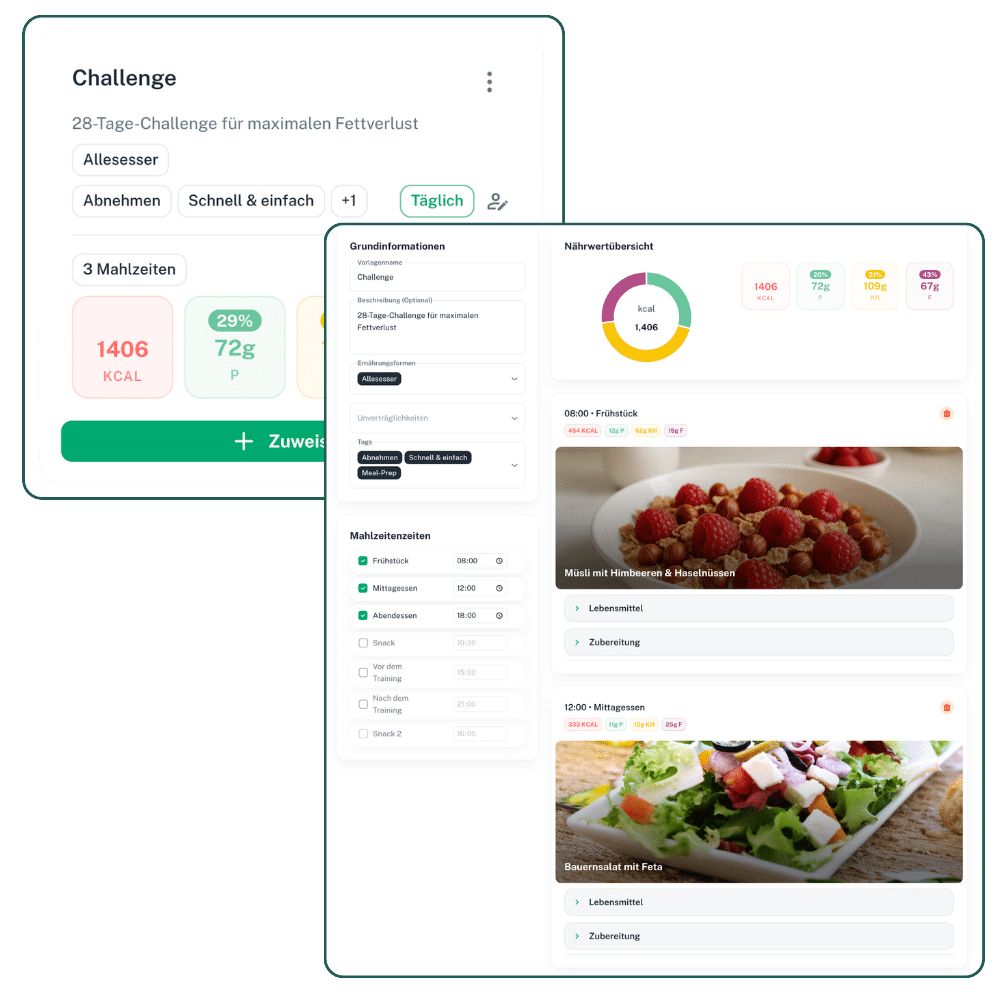
Create and assign a weekly plan template
1. In the dashboard, go to Meal plans > Add new template.
2. Create, for example, a weekly plan with simple recipes that is ideal for the challenge.
3. Save it as a template and assign it to all "Challenge" clients.
This way, all participants start with the same structure and get a clear roadmap for the challenge right away. It saves you time on individual preparation and ensures more consistency and commitment throughout.
Step 6:
Create client accounts with the "Challenge" segment
1. In the dashboard, go to Clients > Add new client.
2. Create the client accounts, send the app login details by email and fill in the intake form (alternatively: have the participants fill in the intake form themselves).
Alternatively, you can first create the clients without an app account and then activate the app account and send the login details, e.g. one day before the challenge starts.
TIP: Tag all participants with the "Challenge" segment. This groups all participants for a better overview and lets you share content in a more targeted way.

Step 7:
Create a group chat for the challenge
1. In the dashboard, go to Chat.
2. Create a group chat for exchange, motivation and Q&A.
3. Select the "Challenge" segment as recipients so all participants are brought together in one shared chat.
This gives you a central place for questions, feedback and motivation. It strengthens the community, keeps participants actively involved and makes the challenge much more personal.

Step 8:
The challenge begins!
1. Start with a kickoff meeting, online or in person.
2. Clarify with the participants how the app should be used in everyday life.
3. Present the most important features and point out tools like weight tracking and check-ins.
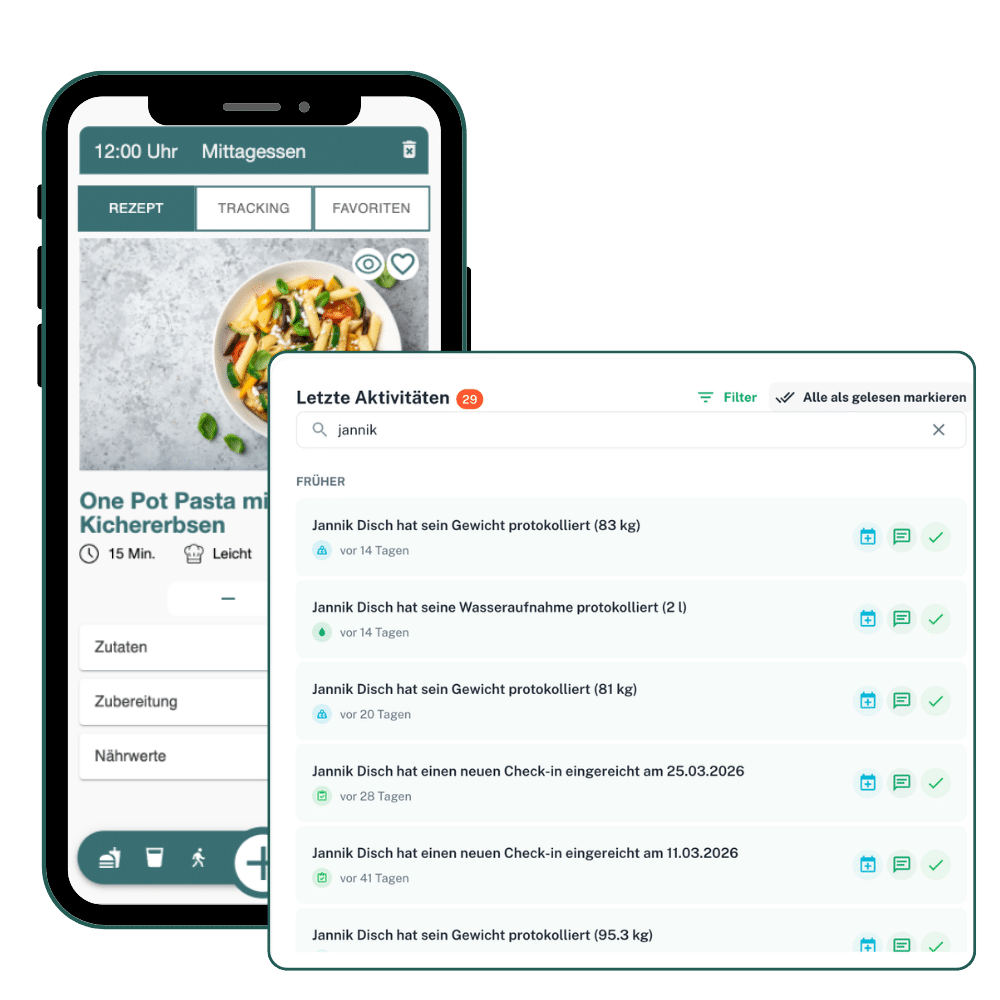
4. Use the activity feed in the dashboard to keep an eye on your clients' activities at all times.
This creates clarity, orientation and commitment right from the start. Your participants know what to expect, and you have all activities in view in one place.
Your direct access to the nutrition software
Test phase ends automatically. No payment details required.
More posts
 6. November 2026
Automate your coaching business: SOPs, an assistant and a weekly routine from 30 clients
From about 30 clients, hard work isn't enough: run a time audit, use five SOP templates, check if an assistant pays off and set a fixed weekly routine.
- 3. November 2026
Meta ads for coaches: your first lead ad with €10 to €20 a day
Set up your first Meta lead ad with €10 to €20 a day: campaign click by click, filtering form questions, ad copy that gets approved and fast lead follow-up.
- 30. October 2026
ManyChat for Coaches: How to Set Up the “Comment PLAN” Automation Step by Step
Turn a comment under your Reel into a freebie, three qualifying questions and a booked discovery call: the complete ManyChat flow with copy-ready DM texts.
- 27. October 2026
One video, ten pieces of content: content repurposing with YouTube, Shorts, TikTok and LinkedIn
Turn one video per week into ten pieces of content for Shorts, TikTok, Instagram, LinkedIn, newsletter and blog, with a ready-made process and weekly plan.
- 23. October 2026
Selling on Instagram: Story Sequences, Broadcast Channels and DM Templates
Sell your coaching on Instagram without being pushy: a 5-day Story sequence, a four-step DM script, friendly follow-up rules and a broadcast channel rhythm.
- 21. October 2026
The October 2026 Update: Everything New in Detail
Target weight calculator, food tracking without a scale, faster check-ins and meal plans, PDF training plans: here's everything new in the October 2026 update.
- 20. October 2026
Reel Hooks for Coaches: 30 Copy-and-Paste Formulas for Fitness and Nutrition Coaches
30 Reel hook formulas with fitness and nutrition examples, a hook generator for your niche and a simple protocol for testing hooks with Trial Reels.
- 16. October 2026
Instagram Reels for Coaches: The Complete Workflow from Idea to Posting
Create three to five Instagram Reels per week in about three hours: with one shooting day, four core formats, a caption template and a clear review after 7 days.
- 13. October 2026
Your First 10 Clients in 30 Days: A Daily Plan for Coaches Without an Audience
No followers, no ad budget? This 30-day plan shows you how to win your first clients as a coach through your network, a daily routine and local channels.
- 9. October 2026
Starting a coaching business: the launch checklist for registration, taxes, contracts, insurance and tools
Register, sort out taxes, get insured, set up contracts, choose tools: the launch checklist for coaches in Germany with time estimates and a break-even calculator.
- 7. October 2026
How Much Does Software for Nutritionists and Coaches Cost? 2026 Prices, Honestly Calculated
Software for nutritionists starts at around €25 per month. See what you really pay at 10, 30 and 50 clients, what's included, and when switching from Excel and Word pays off.
- 6. October 2026
Create a coaching offer that sells: signature program, building blocks and guarantee
Package a clear result into a 12-week signature program with the right building blocks, a fair price and a conditional guarantee, built in five working days.
- 5. October 2026
Coaching Apps for Online Fitness Coaches Compared (2026)
Seven coaching apps for online fitness coaches compared: language, cost for 30 clients, branded apps, nutrition features and server locations, with all sources listed.
- 2. October 2026
More clients without more work: how to scale your coaching business with digital processes
Where coaches lose time every day, and how templates, automation and your own app help you coach more people without the quality suffering.
- 29. September 2026
Coaching clients effectively: what a professional coaching process looks like
From onboarding to renewal: how to support your clients so they get results, stay longer and recommend you.
- 25. September 2026
The Perfect Online Coaching: Why Less Is More
Perfect online coaching is simple: clear nutrition, the right training and regular check-ins. Here's how to give your clients a clear roadmap.
- 25. September 2026
Make money as an online coach: prices, packages and models compared
How many clients you need for your target income, which pricing model suits you and why hourly rates hold you back.
- 22. September 2026
Content plan for coaches: what to post to be seen as an expert
Publish content regularly that builds trust and brings in inquiries, with the right content mix, four content pillars and one fixed content day a week.
- 18. September 2026
Check-ins in Online Coaching: How to Implement Them
Weekly check-ins keep online clients on track and save you time. Here's how to set them up in 4 steps, including questions and a checklist.
- 18. September 2026
Find your niche as an online coach: why “I help everyone” costs you clients
Why "I help everyone" costs you clients, and how to find a niche that suits you, that people pay for and that sets you apart.
- 15. September 2026
Referral Marketing for Coaches: How Your Clients Become Your Best Salespeople
Why referrals are the strongest way to win new clients and how to make them predictable: the right moments to ask, templates, incentives and a calculator.
- 14. September 2026
How to Structure 12-Week Nutrition Coaching: Process, Check-ins and Template
Structure 12-week nutrition coaching in three four-week phases, with an intake, weekly check-ins and a plan for afterwards. Includes a template to prepare your program.
- 11. September 2026
The Perfect Discovery Call: How to Turn Prospects into Paying Clients
A 30-minute discovery call script for nutrition and fitness coaches: 5 phases, example phrases and answers to objections, so your close never feels like selling.
- 8. September 2026
Lead Magnet for Coaches: 10 Freebie Ideas That Grow Your Email List
10 freebie ideas for nutrition and fitness coaches, a quick test for your idea and the 5-email sequence that turns downloads into discovery calls.
- 4. September 2026
Your Ultimate Playbook for Systematic Online Coaching
Check-ins, live chat, training and meal plans, knowledge documents and weight tracking: how to use every client app feature on purpose, from setup and intake to onboarding with app icon and push notifications. That keeps your client in the app every day, and you always know what to work on.
- 4. September 2026
From Follower to Client: The Instagram Funnel for Coaches
How nutrition and fitness coaches turn Instagram reach into real inquiries: profile, Reels, stories, DMs and the step to the discovery call.
- 2. September 2026
Meal Plan Templates That Think Ahead
Recipe suggestions based on your filters, automatic plan creation, smart conflict checks and dynamic adjustment to individual targets: the new features help you create and distribute meal plans faster and more precisely.
- 1. September 2026
How to Get Clients as an Online Coach
7 proven strategies to get clients as an online coach, with concrete steps, common mistakes, a client calculator and a 30-day plan you can start today.
- 28. August 2026
Data Protection in Online Coaching: How to Handle Health Data Properly
How coaches handle health data under the GDPR: explicit consent, data processing agreements, deletion periods, safe channels and a 12-point checklist.
- 25. August 2026
Nutrition Coaching for Sports Clubs: For Athletes and Teams
How to set up nutrition coaching in a sports club: team workshops, one-on-one coaching, a season plan, game day routine, youth teams and funding.
- 21. August 2026
Nutrition Coaching in Gyms: An Add-On Service for Members
How gyms add nutrition coaching for members: 4 models, who coaches, a 5-stage process, pricing calculator, marketing checklist and key metrics.
- 18. August 2026
How to Build a Group Coaching Program: Concept, Pricing and Structure
When a group makes more sense than 1:1, which format and size fit you, how an 8 or 12 week group runs and how to price it.
- 14. August 2026
Client Retention in Coaching: Why Clients Cancel and How to Prevent It
Why coaching clients really cancel and how to keep them longer: cancellation reasons by phase, a retention calculator and copy-ready templates.
- 11. August 2026
Your Coaching Website: What It Needs So Visitors Reach Out
What your coaching website needs to turn visitors into inquiries: homepage structure, offer and about page, testimonials, pricing and a quick website check.
- 7. August 2026
Get Found Locally: Google Business Profile and Website SEO for Coaches and Nutritionists
Set up your Google Business Profile, collect genuine reviews and build local service pages so people in your area find you when they search.
- 4. August 2026
Digitize Your Nutrition Coaching: From Excel, PDF and WhatsApp to Your Own App
Move your nutrition coaching from Excel, PDFs and WhatsApp into one app: maturity check, decluttering, the right order and a plan to bring clients along.
- 31. July 2026
Client Onboarding in Coaching: The First 7 Days That Decide Everything
Plan your client onboarding day by day: welcome, intake, goals, app setup, first plan, check-in and a quick win that keeps new clients motivated.
- 28. July 2026
From Personal Trainer to Online Coach: How to Make the Switch Step by Step
How to go from personal trainer to online coach without quitting the studio: start hybrid, digitize your offer, bring clients along and follow a 6-month timeline.
- 24. July 2026
AI in Coaching: How to Use ChatGPT and Co. Wisely and Responsibly
Where ChatGPT and co. save you time, where to draw the line, why health data stays out, plus prompt templates and 7 rules for responsible use.
- 21. July 2026
Food Log Feedback: How to Move Clients Forward with Every Review
Review your clients' food logs in five passes and write feedback that motivates instead of lectures: with a worked example, phrases and common mistakes.
- 17. July 2026
Corporate Nutrition Coaching: How to Win Business Clients in Workplace Health Management
Which formats companies book, who decides, how to write a proposal, what to charge and how to measure results in workplace health management.
- 14. July 2026
Digital Products for Coaches: Courses, Programs and Challenges as a Second Income Stream
Courses, challenges and programs as a second income stream: which format fits, how to test an idea first, and how to price and sell it without hurting client care.
- 10. July 2026
Referral Partners for Coaches: How to Build a Network with Doctors, Physical Therapists and Gyms
How to find doctors, physios and gyms as referral partners, approach them with a ready-made template and build a partnership that works for both sides.
- 9. July 2026
Forms & Questionnaires
With Natty Gains you create custom forms and questionnaires as a coach, assign them directly to your clients and get all answers in one place in your dashboard. This gives you structured workflows for intake, check-ins, habits, goal reviews and progress tracking, with no manual follow-up work. Instead of individual questionnaires, you build a consistent system for your coaching.
- 7. July 2026
Weight Loss Plateau: How to Guide Clients Through the Stall
How to tell a real weight loss plateau from normal fluctuations, check the data with weekly averages and keep your clients motivated.
- 3. July 2026
Changing Habits: How to Guide Clients to Behaviour Change That Lasts
Help your clients change habits with mini steps, if-then plans, simple habit tracking and conversations that catch relapses instead of punishing them.
- 30. June 2026
Practical Meal Plans: How to Create a Plan Clients Actually Follow
How to build a practical meal plan that fits your clients' everyday life, with swap lists, a small recipe rotation and weekly feedback.
- 26. June 2026
Email Marketing for Coaches: Newsletters That Build Trust and Sell
Build your list, start with a welcome sequence and write newsletters that build trust and sell without pressure, including a subject line tester.
- 23. June 2026
Collecting Client Testimonials: How to Use Social Proof as a Coach
How to collect honest client testimonials as a coach: when to ask, which interview questions to use, how to handle consent and where to show them.
- 22. April 2026
Rock Your Next Challenge with This Setup
This guide shows you step by step how to set up a challenge with Natty Gains. It's built so you can copy it directly and pass it on to your team. It's based on the platform's key features: client segments, documents, automations, meal plans and group chats.
- 20. November 2025
Client Meal Comments for More Meaningful Food Logs
Being able to comment on and rate meals directly changes nutrition coaching. Clients can not only log their meals but also share their experience with taste, preparation, eating habits or possible physical reactions right away.
- 11. November 2025
New Software Feature: Nutrient Preferences and Detailed Micronutrient Analysis
Get deeper insight into nutrient composition, all the way down to individual foods. Decide which nutrients you prioritize for your target group, such as iron, omega-3 or zinc. This helps you explain connections better and steer nutrition more precisely.
- 21. October 2025
New Feature: Upload Your Own Coach Documents and Share Them with Clients
Make your coaching even more structured from the start: upload all relevant materials such as PDFs, training plans or coaching guides directly in your dashboard and share them with your clients through the app. Your clients see this content bundled and clearly visible on the home screen of their app. That way all important resources are always at hand, with no searching and no detours.
- 3. June 2025
New: Let Your Clients Track Daily Movement, Sports Activities and Water Intake
Your clients can now log steps, workouts and water intake in the client app, giving you a clearer picture of their energy expenditure in your coaching dashboard.
- 19. March 2025
New software update: Three new tools for your nutritional advice
With our latest software update, we are expanding Natty Gains with three powerful tools that make our software even more comprehensive: the price and quote calculator, the invoicing tool, and the training planner.
- 2. September 2024
Manage nutrition plans and nutrition diaries centrally
Discover the latest features of the Natty Gains software: centralized management of nutrition plans, flexible post-history options, and personalized client communication.
- 10. June 2024
Faster food tracking for your customers with the nutrition app
Easier and faster food tracking for your customers with the nutrition app. Made possible by a software update in the Natty Gains nutritionist software.
- 28. March 2024
Perform check-ins with your customers via the app and provide advisor feedback
New feature: Weekly check-in function with feedback option: This allows your customers to give you regular feedback directly via their app.
- 6. January 2024
The new Natty Gains dashboard
Your cockpit for your consulting business. Manage all areas of your nutritional advice and support centrally in one place.
- 10. December 2023
Best practice for app onboarding
Initial situation: Customer has booked a coaching session. Ideally, what are the NEXT STEPS?
- 6. November 2023
Can nutritionists be replaced by nutrition apps?
Can nutritionists be replaced by nutrition apps? How humans and software become a perfect symbiosis
- 31. October 2023
Software for nutritional counseling to create nutrition plans
The use of nutritional advice software saves time when creating nutrition plans, increases efficiency and improves the quality of advice.
- 29. October 2023
Professionalization of nutritional advice: Natty Gains as an indispensable software tool
Natty Gains is an indispensable software tool for professionalizing nutritional advice by optimizing workflows and increasing the quality and credibility of advice.
- 17. October 2023
Your start in business as a nutritionist: challenges and their solutions
Working as a nutritionist is not only exciting, but also varied and helpful for many people. Nutritionists usually choose their profession out of a passion for nutrition.
- 18. September 2023
Scaling the nutritionist business: on the road to success with Natty Gains
The world of nutritional advice is changing. The demand for professional nutritional advice is growing steadily as more and more people pay attention to their health and strive for more conscious eating habits.
- 12. August 2023
Effective use of time in nutritional advice: How Natty Gains optimizes the workflow
The effective use of time is of crucial importance in nutritional counseling. Time is a limited commodity and dietitians need to ensure that they make the best use of it to provide the best possible service to their clients.
- 10. July 2023
Innovative nutritional advice tool: Introduction to Natty Gains
Natty Gains is a groundbreaking software tool designed specifically for dietitians to revolutionize the dietitian workflow.
- 12. June 2023
Software update: Track and analyze the progress of your customers with the new statistics area
We are very pleased to announce that we have prepared an exciting new software update for our platform. With this update, we offer you an even more powerful tool with which you can track your customers' progress more comprehensively and analyze it more precisely.
- 23. March 2023
Top trends for nutritional advice in 2023
How you can adapt your offer to the needs of your customers
- 16. March 2023
How you can use digital tools to offer personalized nutritional advice
More and more people today are focusing on a healthy diet and seeking support from professional nutritionists. In today's world, technology is playing an increasingly important role in nutritional advice.
- 9. March 2023
Nutritional advice for different lifestyles
How you can tailor your advice for people with different needs
- 1. March 2023
The importance of personalization in nutritional advice
Why an individual approach is crucial for success
- 24. January 2023
Online tools for working effectively as a self-employed nutritionist
Being self-employed as a freelancer means first of all being professionally independent and enjoying a lot of freedom. You are your own boss and decide on all aspects of your self-employment yourself.
- 25. October 2022
Nutritional advice as a profitable business: How to halve your working hours as a nutritionist and double your number of clients
There are actually still nutritionists who do all the work steps by hand. Or at least very "advanced" with Word, Excel or Google Sheets.
- 15. September 2022
Nutritionist training – overview and comparison
What types of nutritionist training are there, which training institutes offer which courses and how expensive is the training? We answer the most important questions.
- 5. August 2022
Typical mistakes when starting out as a freelance nutritionist
Starting out as a nutritionist is an exciting time. It's the perfect opportunity to turn a passion for healthy eating and knowledge of the human body into a successful nutrition counseling career. However, getting started in this area is also associated with a number of challenges. Many consultants make typical mistakes that can have a negative impact on their career.
- 30. June 2022
Becoming a self-employed nutritionist: What you need to get started – and what you don’t
Becoming a self-employed nutritionist can be a very good career decision, especially in today's world. If you're interested in becoming a self-employed nutritionist, then you've come to the right place. In this article, we'll show you what you need to get started - and what you don't.
- 16. June 2022
Low carb and keto diets as new diets in nutrition software
In addition to the existing diets - omnivorous, pescetarian, vegetarian, vegan and paleo - two new options have now been added to the medical history form for creating diet plans: Low Carb and Keto Diet.
- 9. June 2022
Faster workflow for dietitians with templates for daily plans, meals, recipes and foods
Manage your templates in your master account and set up (new) customers even more efficiently.
- 2. June 2022
Nutrition plan software for Mac, iPad and PC
Natty Gains is a nutrition plan software that is compatible with all Apple devices such as the iMac, MacBook, iPad and iPhone. The software tool offers a wealth of tools and enables you as a nutritionist to create, manage, customize and approve nutrition plans for your clients.
- 21. January 2022
How to let your clients keep an online food diary
A food diary is an important tool for measuring the success or failure of a change in diet. It serves as a reference for the daily meals and is used to keep the nutritionist, coach or trainer informed of the client's progress.
- 9. January 2022
Nutritional value calculation down to the last detail: Now also with amino acids, sugar types and fatty acids
For many nutritionists, individual nutritional advice starts with a nutritional value calculation based on a food diary kept by the customer.
- 9. January 2022
How to recognize and correct a nutrient deficiency with the nutrition software
The Natty Gains nutritionist software supports you as a nutritionist in recognizing this nutrient deficiency in your client and also shows you ways and solutions on how you can optimize your client's nutrient supply and improve their health.
- 28. October 2021
Create nutrition plans and further individualize them down to the details of the recipes
With a nutrition plan, you provide your customer with clear instructions. This means he knows exactly what and how much he should, can, must or may eat - depending on the goal.


